
Emails by e-commerce stores are considered and read by customers. As per MailChimp, average open rate for emails sent by online stores is 15.68%. For order email attachments, this rate is at least twice or thrice. So, if you are thinking to attach useful files i.e. enable attachment for order email, it will indeed be a good decision.
Attachments such as order invoices, bill, warrantee card, how-to guide, quality certificate, document to help customer getting started, images, explainer videos, external link for demo, etc. can be added to order emails as per your store’s need.
To learn how to enable or disable attachment for order email as per the order status in WooCommerce, read ahead.
Step-by-Step Guide to Adding Attachment for Order Emails
WooCommerce Product Attachments can be enabled by adding the right plugin for your online shop. However, while choosing your attachment extension for WooCommerce, make sure to check the bulk attachment features of each plugin that you consider for this purpose.
We recommend Product Attachment for WooCommerce Plugin by the DotStore.
This plugin allows store owners enable downloadable as well as viewable files/pages as attachment with expiry dates. While letting you add any number of attachments in your store, Product Attachment for WooCommerce can accept numerous file types, such as, documents, JPG files, PDF files and video attachments.
Bulk attachments for the whole store, a category, a few categories, a product or a set of products can be enabled using this plugin to reduce your hassles.
All these attachments can be enabled for order emails and can be enabled or disabled as per order status. There are even more functionalities related to product attachment, but covering them will be out of scope for this article. Here is the demo link for you.
Step 1: Enable/Disable Attachment for Order Email for the Whole Store as per Email Status
If you do not have attachments for all order statuses but for the specific ones, like completed, processing and on-hold, you might want to enable attachments for one or multiple or all order statuses.
Go to plugin dashboard and in Settings, scroll down to the option where you could select statuses for email attachments enablement.
If you want to enable attachment for one of 2 of the given statuses, tick the checkbox adjacent to those statuses.

To enable attachments for these 3 statuses store-wide, either tick all checkboxes or check none.
On the other hand, do not tick anything if you want to configure different rules for different conditions.
Add more details in the Settings section and move to the Bulk attachment Tab.
Adding Attachment file for Store-wide Settings
In the case of enabling/disabling attachment for order email, you can just create a bulk attachment and add relevant details. In the email status-related option, do not make any choice.
Step 2: Setting Order Status Related Rules for Bulk Attachments
There are times when WooCommerce Store Owners want to enable different order attachments for different products, categories and order statuses. In that case, you have the option to directly add order-status related settings to the bulk attachments.
To begin with this, complete the store-wide product attachment Settings and move to the Bulk Attachment tab. Make sure that you do not touch the status-related checkboxes in the main settings.
From here, you may create multiple bulk attachments.
So, let’s create one and add attachment for order email with it.

While you can add other details relevant to the bulk attachment as per your needs, see this section:

Product Attachments for WooCommerce lets you enable or disable attachment for order email as per following order statuses per bulk attachment:
- Completed
- On-hold
- Refunded
- Processing
- Failed
- Cancelled
- Pending Payment
You can leave all boxes unchecked when you want to enable your product attachment for relevant emails, regardless of order status (or for all order statuses).
You also have the privilege to set expiry date for your email attachments, be it a direct attachment for an external link. Alternatively, you can keep the expiry date disabled too.

Besides that, you can choose the products, categories and tags to include or exclude for your configured settings.
![How to showcase order email attachment based on WooCommerce order status 5 Enable Email Attachment for [or exclude] Selective Products, Categories and/or tags](https://www.multidots.com/olddotstore/wp-content/uploads/sites/45/2021/03/image-21.png)
In the end, save settings.
Now, you can create as many bulk attachments with different email attachments and different order status settings for your online store.
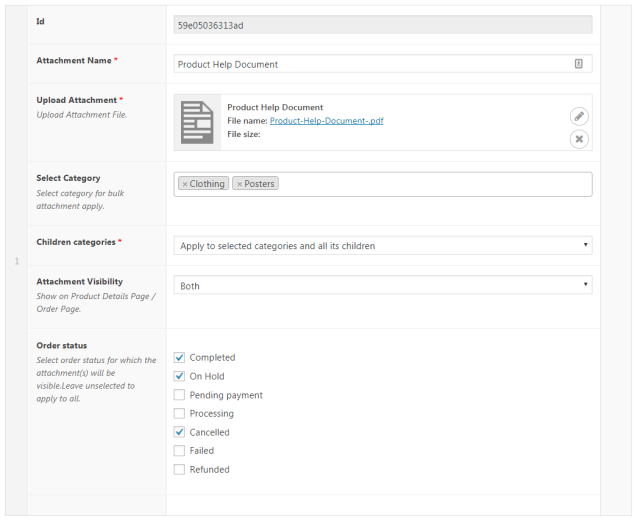
Example 1 – Sending a Product Help Document with Completed, Cancelled and on-hold orders
If someone has ordered your product and the product delivery is completed, you might want to send product help document to them. In addition, you might also want to send the same document for orders on-hold or cancelled orders, to reduce confusions of your prospects and make the purchase the product.
The above help document is specific to orders belonging to the clothing and posters categories.
To attain this for your online store, you must create a Bulk Attachment, add its name, upload the desired file, choose multiple (or one) categories, set product visibility, and in the end, check the boxes adjacent to relevant order statuses (i.e. completed, on-hold, and cancelled).

Save settings and it’s done. You can place a demo order for the respective category and test the recently-enabled settings for your WooCommerce store now.
Here is how an email attachment for a completed order looks like:
![How to showcase order email attachment based on WooCommerce order status 7 WooCommerce Product Attachment for Email [Order Status: Completed]](https://www.multidots.com/olddotstore/wp-content/uploads/sites/45/2021/03/image-23.png)
Example 2 – Sending Attachment for Order Email for completed, pending-payment, and processing order-statuses
For the same scenario as ‘Example 1’ in this article, you may want to send the product help document to purchases with order status as ‘completed’, ‘pending payment’, and ‘processing’.
Sending this attachment to pending-payment or processing order statuses for makes more sense as it will increase the chance of confirmed sale. For ‘completed’ orders, it will reduce customer queries and help them. So, the customer retention and satisfaction rate for your store will improve by this simple action.
To do it, you just need to make different selections as shown in the image and save settings. [See Image]

Example 3 – Sending Refund Confirmation PDF
You can enable WooCommerce Product Attachments, such as – refund details PDF for your orders with the status as ‘refunded’. For this, just create a bulk attachment, add the attachment PDF to it, and set the order status for this attachment as ‘refunded’.

Example 4 – Details Related to the Purchase on-hold
There could be multiple reasons to put an order on-hold, for example – due to the product going out-of-stock abruptly, due to a request from customer, due to payment-related conflicts, and so on. In such a case, you must notify your customer when you change the order status to ‘on-hold’.
Instead of sending an email manually, you can automate the process through WooCommerce Product Attachments plugin.

In case you find any difficulty in using the Product Attachment for WooCommerce Plugin, please check the related how-to documents or the relevant part of plugin documentation. You may also reach out to us through email or live chat option in your DotStore account for instant support facilities.


