
Inherently adaptable and easy to manage, WooCommerce websites are a go-to choice for many businesses running e-commerce stores. While WooCommerce is excellent as is, there may be times when a business desires additional functionalities. For instance, a business might want to introduce a fee-based varying product structure within their WooCommerce framework. This will require some level of customization or the addition of specific functionalities.
First things first – do you know, what do we mean by Variable products in WooCommerce?
Let us explain.
In the e-commerce landscape, businesses sell multiple products that are identical but vary in size, color, configuration, etc. For example:
- A dress which is available in small, medium, large, and extra large size.
- A pen drive has different storage capacities such as 2GB, 4GB, 8GB, and 16GB for the different items of the same product.
- A T-shirt which is available in red, black, blue, white and maroon color.
These all are variable products. You might be selling any of these.
For variable products, sellers need a way to capture additional details to identify which item from the variable product type is ordered. The price can, too, be different for variable products’ items. In such cases, you’ll need to add extra fees in WooCommerce to ensure that you are selling your products at the price you want.
Why would you need to Apply an Extra Fee based on Variable Products?
As the configuration and properties of items grouped in the variable product may vary significantly, eCommerce store owners sometimes charge a different fee for these items. Now, as the product is the same and you have some variations of the product, it is difficult to deploy different pricing for different variations.
Extra fee is an easy way out.
By adding a base fee to the variable product and applying an extra cost to the variations of your product can solve the whole issue.
If you want to learn how then this article is definitely for you. In this post, we are going to demonstrate how to charge a variable product-based fee in WooCommerce.
How to Charge Variable Product-Based Fee in WooCommerce?
Let us pick one variable product for our demo store, to begin the tutorial.
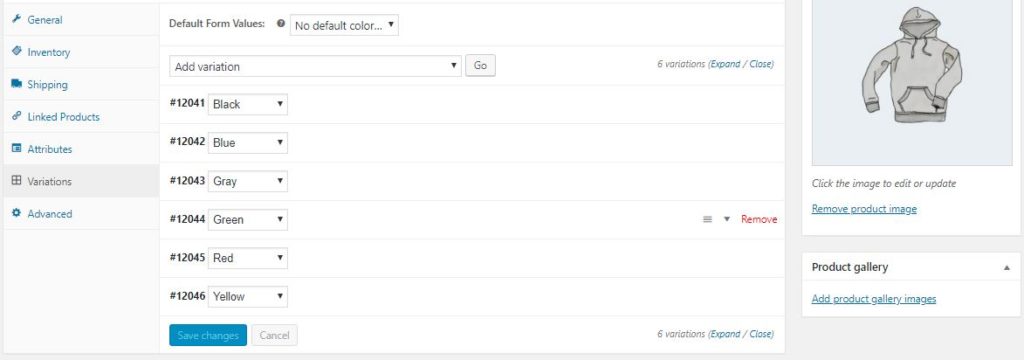
We’ve added a product, named ‘Hoodie with Pocket’ and there are 6 variations of it. Look at this image –

Now, let’s say, you want to charge $1 extra for the ‘black’ variation and $0.5 extra for the ‘Blue’ variation.
How will you do that?
Step 1 – Install the Plugin
Install the plugin — WooCommerce Conditional Product Fees for Checkout — which allows you to charge extra fees based on different parameters, such as country, zip code, state, product weight, product quantity, tag, user role, user, cart subtotal, payment method, variable fee and more.
You can get the premium version of the WooCommerce Conditional Product Fees for Checkout plugin if you need it.
Step 2 – Setup the Prerequisites
Install the plugin from the above link or open this demo link to follow our instructions now. It will be better if you perform the same actions as ours so that the variable product-based extra fee can be enabled for your online store easily.
Step 3 – Fill Fee Configuration Form
As the plugin is installed now, you must be able to view its name in the left sidebar on your WooCommerce admin dashboard. Click on its name and select the ‘Add Product Fee’ option from the top section of the new page, which just loaded on your screen.
We are going to create a product fee to add additional cost to your black Hoodie with Pocket.
For this, you need to begin by filling out the ‘Fee Configuration’ form first.
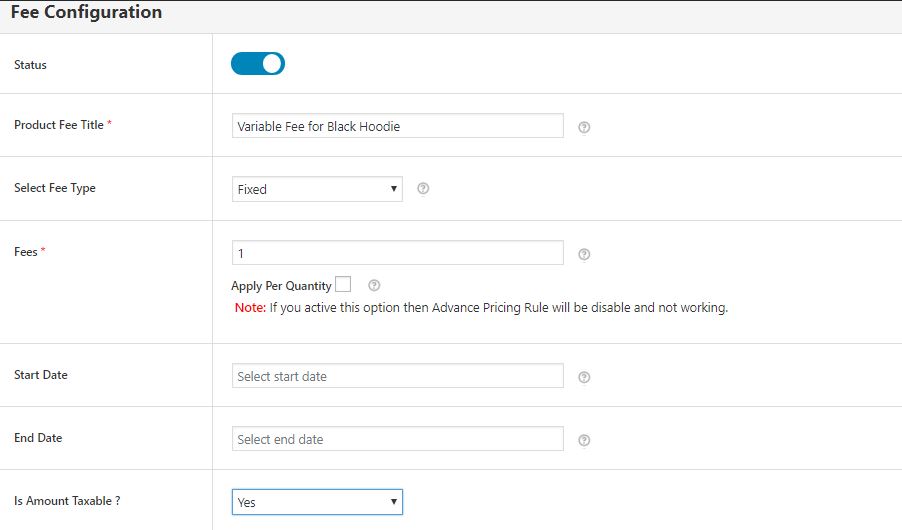
In the form, details like title, fee type, fee, start date, end date, status, extra fee taxable or not, etc. are to be added.
Remember that this Product Fee Title will be visible to your customers, so choose a sensible name that explains the purpose of its application on their cart. Let us name it ‘Variable Fee for Black Hoodie’ as of now.
As we are going to charge a fixed $1 extra on this variable product, select fee type as fixed and fees as 1. In case you want to charge a fee proportional to the actual fee on the product, select fee type as variable and fill in the fees’ percentage, e.g. 2, 5.6, etc. in the ‘fee’ textbox.
If you want this fee to be applied to your variable product for a specific duration, add the start date and end date to the Product Fee. However, these 2 fields are optional and can be left blank.
Whenever you don’t want to charge this extra fee anymore, you can disable the fee (See first toggle bar – Top field of the form).
As this fee is to be added to the final cost of your product in our case, you must be willing to apply tax on it. Therefore, select ‘yes’ for the ‘Is taxable or not’ field of the fee configuration form.
After completion, your fee configuration form will look like this –

Step 4 – Add Conditional Rules to your Product Fee
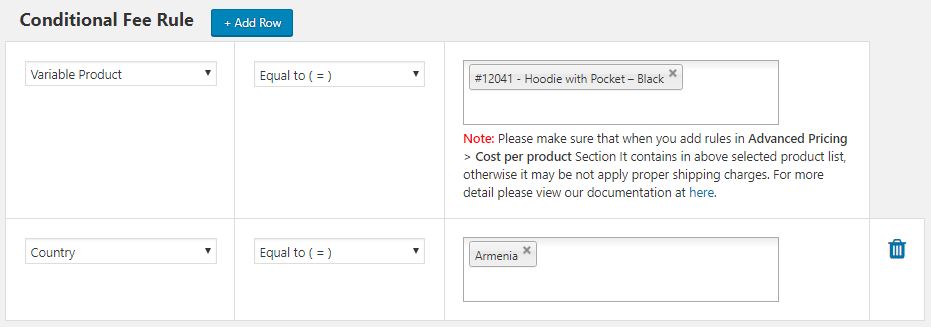
As we want to charge $1 extra on the black-colored hoodie, we’ll add a Conditional Fee rule for that. Here’s how your rule will appear –

Before moving forward, let us explain a conditional rule and how to add one.
A conditional rule is a restriction you put on your Product Fee method. Through it, you define when your Product Fee should be applied. So, in conclusion, we can say that the conditional rule(s) decided the scope of your Product Fee method.
If you don’t add any conditional rule, it will be considered a universal extra Product Fee and will be applied to the cart of your buyers every time a purchase is made.
On the left side, you have a dropdown list of parameters for which you can add an extra fee to your products. Afterward, you’ve got to choose a conditional operator and value for the rule as per your online store’s need.
Using this WooCommerce plugin, you can add as many rules as you want to add for your variable product.
For example, if you want this fee to be applied to Armenia only, add a country-based rule (as depicted below) by clicking on the –

Once you have applied all the rules to your Product Fee method, save the settings and exit.
Now, your WooCommerce store is enabled with the capabilities of charging variable product-based fees in WooCommerce.
Similarly, you can create another Product Fee for the red variation and charge $0.5 extra for it.
Whenever you want to apply the same extra fee to multiple variations of a variable product, you can add the names of those variations within the same rule instead of adding multiple rules or creating separate product fee methods.
Final words!
In conclusion, managing variable products in WooCommerce may seem challenging at first, but with the right tools and guidance, it can become a straightforward process.
The WooCommerce Conditional Product Fees for Checkout Plugin offers an effective solution for handling extra fees based on variable product attributes, shipping, payment gateways, and much more. By following this tutorial, you can confidently start charging extra fees for variations in aspects like color, size, or storage capacity of your products.
Ultimately, this plugin not only simplifies pricing management but also helps in streamlining the shopping experience for your customers. This not only ensures your variable products account for additional costs but also allows you to fine-tune your store’s pricing strategy for optimum results.
FAQs
What is a variable product in WooCommerce?
A WooCommerce variable product refers to a product with multiple variations that differ in as many attributes like size, color, or configuration. Examples to create variable products include items like clothing available in different sizes or colors and devices with different storage capacities.
How do I get a variable product in WooCommerce?
To create a variable product in WooCommerce, go to ‘Products > Add New’ in your WordPress admin dashboard. From the ‘Product Data’ dropdown menu, choose ‘Variable Product.’ Add custom attributes and display variations as needed, then publish the product.
What is the difference between simple product and variable product in WooCommerce?
A simple product is a single, standalone product with no variations. A variable product, on the other hand, has multiple variations based on different attribute values. Simple products have a single price, while variable products may have different prices for each variation.
How do I set up variations and variable products in WooCommerce?
In WooCommerce, to create product variations, after selecting ‘Variable Product’ for your product, go to the ‘Attributes’ tab, add the attributes that display product variations, and then Save Attributes. For example, color or size.
How do I add a term to an attribute in WooCommerce?
To create attributes, go to the ‘Attributes’ tab when editing a variable product. After creating the product attributes, click on ‘Configure terms’ next to the attribute name. In the new window, you can add new terms for the attribute (e.g., adding different colors for the ‘Color’ attribute).
What are the transaction fees for WooCommerce?
There aren’t any transaction fees on a WooCommerce store itself. However, payment gateways like PayPal or Stripe, used for processing payments, will have their own transaction fees, which vary between providers and countries.
What do attributes mean in WooCommerce?
Attributes in WooCommerce are characteristics that define a product and its variations. Examples include size, color, material, or weight. Attributes are used to create variations tab for variable products, allowing customers to choose the exact product configuration they desire.


